Pages

.


.


Menu Plan Monday: Week of January 24th, 2011


I am still attempting to eat from the pantry again this week.  During last weeks shopping trip I picked up a few key ingredients that needed to be replaced and I purchased one pack of chicken breasts that were on sale for $.97 a pound.  I actually took a day least week to clean out my pantry and take an inventory of what exactly was in there.  I'd say there is an overabundance of cereal but the rest is dwindling nicely.

I followed my plan last week exactly as I was supposed to.  The Cheese Enchiladas were great!  At least the adults liked it. The kids still preferred Amy's brand so I'll have to keep on working on it.  My latest pizza experiment was a HUGE success.  It was the best recipe EVER!  Thank you Gluten Free Mommy for the original recipe which I have adapted.  The Chili Cheese Potato Casserole was a flop.  For my husband not to eat it, it must be a bad idea.  LOL. The chili was good, the cheese sauce was good, it was the potatoes I used (bag of Ore Ida).  I know, I was supposed to use up that 20 pound bag I have.  I was lazy and out of time.  I really need to use up those potatoes this week or turn them into Freezer Mashed Potatoes.


Monday: Chicken Tacos, Mexican rice, Refried Beans.  I have some leftover enchilada sauce from my cheese enchiladas experiment and I thought this would be the perfect way to use that leftover.

Tuesday: Chicken Legs, Macaroni and Cheese, Green beans.  I may try to cook this Picnic Chicken style.  I am wondering if this recipe will work gluten free.

Wednesday: Church Dinner

Thursday: Hamburgers served on fresh baked Rolls, baked beans and broccoli
Friday: Home Made Pizza, Fresh Green Salad

Saturday: Brown Sugar Ham.  I have leftover ham from Christmas.  Its a giant one actually so I may have to figure out how to half it.  But I must force myself to use it up before it gets freezer burned.

Sunday: Undecided...


reade more... Résuméabuiyad

Balsamic Italian Dressing and Italian Seasoning Blend

Make up this seasoning blend in bulk and keep it handy.  It will quickly replace your packets of Italian dressing seasoning mix you buy from the store.  It is so economical to make and the best part is that you know exactly what is going into it.  No preservatives or ingredients you can not pronounce.  But that is not the best part.  The best part is this is one incredibly good Italian salad dressing recipe.

When I was on the Low Iodine diet, this was the salad dressing I lived by.  I grew so fond of it that I continued to make it long after I needed to.  There is nothing better than fresh salad dressing and it is so easy to whip it up real quick.  I absolutely love the taste of the fresh Extra Virgin Olive Oil in this recipe.
2 Tablespoons Onion Powder
2 Tablespoons Sugar
4 Tablespoons Oregano
2 Tablespoons Parsley Flakes
6 Tablespoons Salt
1/2 teaspoon Ground Thyme
2 teaspoons Basil
1 teaspoon Garlic Powder

  • Combine seasonings well and store in an air tight container.
To Make Dressing:

2 Tablespoons Dry Mix
1/4 Cup Balsamic Vinegar
2/3 Cup Extra Virgin Olive Oil
3 Tablespoons Water

Add to your Container and shake well.
Store what you don't need right away in the refrigerator.
reade more... Résuméabuiyad

Cheesecake Cupcakes

These little cupcake sized cheesecakes are so easy to make, so incredibly delicious, Gluten Free and adaptable.  Use splenda or agave nectar to make them diabetic or low carb.  Use sugar, honey or syrups.   Use a crust of finely chopped nuts, crumbled cookies or a whole cookie wafer.  It will be just as great if you leave out the crust like I do.  The little excess paper at the top is perfect for a pineapple gravy, cherries, strawberries, peaches or leave it plain. The sky is the limit with this very adaptable little delight.  It is suitable to bring to a pot luck where you are not sure of allergies and they are the perfect serving size.


2 8-Ounce packs of Cream Cheese, room temperature and very soft
1/2 cup Granulated Sweetener
2 Tablespoons Sour Cream
2 eggs
1/2 teaspoon Vanilla

Preheat oven to 325 degrees.
Line muffin tin with papers.
Spray papers inside with oil.

  • Keeping mixer on LOW speed, whip up the cream cheese, sugar, sour cream and vanilla until there are no lumps.
  • Add Eggs one at a time and mix until JUST incorporated.  Do not over mix and keep mixer on low ~ this will help with the middle sinking.
  • Place 3 Tablespoons of Batter inside each cup.  Makes about 12.
  • Place muffin tin inside a sheet cake pan and fill half way up with water.
  • Place both pans inside oven and set timer for 25 minutes.
  • When timer is up, turn oven off and leave door slightly ajar for 1 hour.  This step should prevent sinking.
  • Remove cooled muffins from oven and chill.  
  • Top with your favorite topping.
  • Enjoy!  


Notes:
  1. This recipe makes about a dozen cupcakes or 2 dozen mini cupcakes.
  2. If making this recipe into mini cupcakes, I suggest cutting cooking time down to 15 minutes.
  3. I like the tang the sour cream has in this recipe, but it will turn out well without it.
  4. If using Splenda, I would suggesting using less first and taste to see if it is sweet to your liking.  I personally find that Splenda is sweeter in baking than sugar.
Tasty Tuesday at Dr. Laura's
reade more... Résuméabuiyad

Gluten Free Pizza

It has been over a year now since I consciously ate wheat or gluten.  Pizza crust made with such ingredients is just a fading memory.  But if I close my eyes and try real hard, I can reminisce about what good pizza tasted like.  Cracker type bottom crust, soft yet chewy middle, delicious toppings of my choice.  It can't be all cracker, nor can it be all chewy.  It must be both.

I waited a full six months before I even attempted to make pizza at all.  The first one I attempted was made from Pamela's Bread mix. I must admit, I found it odd that you had to pre-bake the gluten free crust.  But I followed those directions exactly as it instructed. My daughter and I were so happy and full of delight with the final result.  My "wheat eaters" (I have 3 of them) were not so happy. They said it was gross.  Even my BIGGEST FAN, my mother, said something just was not right.  If this is what Gluten Free pizza has to taste like, you can count me out.  LOL.  Understand that this is HUGE deal with my mom who bends over backwards, I think, to be super positive about everything I do.  My daughter and I thought they were just being overly critical.  However, since I will not be making a crust with wheat in MY kitchen, I had to continue on with my search.

I have been trying out various pizza crust recipes and variations of my own for quite some time now.  With egg, without egg, all nutrient dense flours, all starches...I never seemed to find just the right one.  They all were good in their own right, but just not what I was looking for.  Today is the golden day in history that I figure out how to make my own awesomely good Gluten Free Pizza Crust.  From this moment forward, THIS is the way I will be making my pizzas.

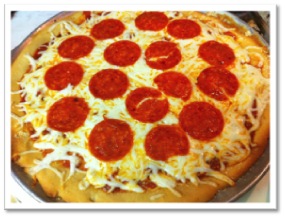
The tapioca in the flour blend plays a key role, I think, in adding that chewy bite.  Too much of it though will make it powdery so Que in the Brown Rice Flour to weigh it down a bit.  This pizza actually is good the next day too.  We added some extra cheese and put it back in the oven on that stone for 10 minutes.  Crust was still crisp at the bottom and chewy in the middle.


1/2 teaspoon Vinegar
2 Eggs
============
3/4 cup Warm Water (110 to 115 degrees)
2 Tablespoons Oil
2 Tablespoons Sugar
2 1/2 teaspoons Yeast
============
2 Cups Flour Blend *
2 Tablespoons Almond Meal
2 teaspoons Xanthan Gum
1 teaspoon Salt
============
Your favorite Spaghetti Sauce
Mozzarella Cheese

Preheat oven to 170 degrees and turn off.
Line Pizza Stone with Parchment Paper sprayed with oil.

  • Add eggs and vinegar to your stand mixer with whip attached and beat eggs until light and foamy.
  • Meanwhile add Warm Water, Oil, Sugar and Yeast and allow to sit and become fluffy.
  • Add Flour, Almond Meal, Gum and Salt to mixer bowl.
  • Next add the yeast/liquid mixtures.
  • Allow to mix for a few minutes until the texture of the batter starts to look like whipped cream cheese.
  • To shape the pizza, line a pizza pan with parchment and generously spray with oil. Spread dough out with your oiled hands.
  • Place dough into warmed oven to rise for 30 minutes.
  • Take dough out of oven, place baking stone inside oven and turn Oven on to 350 degrees.
  • Once oven and stone are preheated, place Pizza crust with parchment inside oven directly on top of your stone. 
  • Bake for 15 minutes.
  • Using your peel, take your pizza crust out of the oven and add your sauce and cheese.
  • Place pizza carefully back onto hot stone inside oven (you will want the dough/parchment to be directly on the stone).
  • Bake for an additional 10 minutes.

I know this recipe is probably asking for items you may not have (stone, peel) but I find that the stone is absolutely necessary in making a gluten free crust.  The stone allows the bottom to crisp and brown while keeping the middle soft and chewy.  I purchased both of these items (stone, peel) at Target for $10.

Note
Not all Pepperoni is Gluten Free.  Please call if you are not sure.  Last pepperoni I fead my daughter caused her to develop blisters in her mouth and down her throat.  The label seemed safe, but it was not.

* My Preferred Gluten Free Flour Blend:
1 cup Tapioca Starch
3/4 cup Brown Rice Flour
1/4 cup Potato Starch

Make Ahead Note:
This Pizza crust can be made ahead and frozen.  After the first 15 minutes of baking, cool on a wire rack, wrap and freeze.  Allow pizza crust to thaw to room temperature and dress pizza and bake as instructed above.

To Use:
Preheat oven and stone to 350 degrees. Allow crust to thaw at room temperature and add your topping.  Bake in the oven for 10 minutes.

I will be linking this recipe to Gluten Free Homemaker's Gluten Free Wednesdays.
reade more... Résuméabuiyad

Cream Puffs and Eclairs

Cream Puffs, Yay!  That is the response I received from my children when I informed them what was for snack yesterday.  These lovely little gems are so good with no filling or topping at all.  I swear I can eat the whole tray.  But adding the whipped cream just puts it over the top.  Growing up my mom always liked Eclairs which is basically a cream puff shaped long instead of round with chocolate frosting on top.  They were a super special treat to her.  I was reflecting back on this fact and thought, ya know, lets try that old reliable cream puff recipe with my favorite Gluten Free flour blend.  I am very pleased at how they turned out.  They puffed and they created the hollow middle.  They behaved exactly like the wheat versions did way back when. The recipe is the exact same, I just replaced the flour.  They are supposed to firm up so they will hold up with filling.  I personally like them fresh from the oven and soft, eggy bread tasting with powder sugar top!  Yum!  If you do not prefer them eggy, I suggest leaving out an egg.


1 cup Water
1/2 cup Butter (1 stick)
1/4 teaspoon Salt
1 teaspoon Vanilla

1 cup Flour Blend *
3 or 4 eggs (depending on your preference)

Preheat oven to 400 degrees
Line baking sheet with Parchment or Silicone Mat

  • Add Water and Butter to a sauce pan and bring to a boil.
  • Take mixture off the heat and add flour, mixing fearce ly to incorporate and dissolve all the flours (about a minute or two).
  • Transfer mixture to your stand mixer with whip attachment and start mixing to cool batter slightly (about a minute).
  • Start adding the eggs, one at at time.  The first egg will take longer than usual to fully incorporate.
  • Continue adding the eggs, one at at time until each one is fully incorporated before adding the next. Finished batter will be smooth and thick.
  • Use your cookie scoop or tablespoon and place 12 mounds of batter on your baking sheet.
  • Bake 15 minutes and then reduce your oven temperature to 350 and continue to bake for 15 to 20 more minutes.  
  • Remove from oven and immediately put a tiny slit in the side so your puffs do not get soggy or deflate.
  • Allow to completely cool.

I am inserting my pastry bag with the long thin tip filled with whipped cream or pudding into that slit I made and filling the middles.  Top with real melted chocolate or slightly melted frosting.  Go ahead and use the whipped cream from the spray can if you desire.  Or take your already made snack pack pudding and add to a sandwich bag with the corner snipped off.

For whipped cream:
In a large mixing bowl place the whipping cream, vanilla extract, and sugar and stir to combine. Cover and chill the bowl and whisk in the refrigerator for at least 30 minutes. When chilled, whip the mixture until soft peaks form.


* My Gluten Free Flour Blend:
1 cup Tapioca Starch
3/4 cup Brown Rice Flour
1/4 cup Potato Starch


Similar Recipes:
Joy of Baking
All Recipes
reade more... Résuméabuiyad

Japanese Steak House Yum-Yum Sauce or Shrimp Sauce

Going to the Japanese Steak House and sitting at the Hibachi grill is my all time favorite thing to do.  I am love with the rice there.  Lets face it though, it is not frugal nor is it always reasonable considering I have to drive an hour to get there.  I had to figure out this mystery.  Like all mysteries I want to figure out, I started with an internet search.  While there are lots of recipes out there dedicated to this type of sauce, I found a blog that is noteworthy.  This blog is dedicated entirely to the recipe of this very special sauce and has a pretty convincing story of its accuracy.  The Mayo and the slight touch of tomato I figured out at the restaurant.  The rest I came up with using my usual mad scientist methods.

I get why this is called Yum-Yum sauce, but why is it called Shrimp Sauce?  Is it because there is shrimp in there?  No.  Well is it because it is shrimp colored?  Not sure.  But I am sure of this.  It taste's AWESOME on Shrimp.  Maybe THAT is why they call it Shrimp Sauce. :-)


1 1/4 Cup Hellman's Mayo
1/4 cup Water
1 Tablespoon Contadina Tomato Paste (unseasoned)
1/2 teaspoon Garlic Powder
1 teaspoon Sugar
1 teaspoon Paprika
pinch of Cayenne

  • In a blender add Mayo, Water, Paste, Garlic Powder, Sugar, Paprika and cayenne if desired.  
  • Blend until all incorporated.  
  • Chill in the refrigerator for 4 hours or more to allow the flavor to set up.
  • Use with your Japanese Fried Rice or Seafood dish.  We love it with fish sticks.
reade more... Résuméabuiyad

Quick and Easy Mexican Rice

I will never forget the first time buying a packet of Lipton Mexican style rice as an adult.  I lived in New Jersey and worked full time with an hour commute each way.  Super frugal check out mommy was saying to me, "You know you can just cook your rice along with a can of diced tomatoes and it will turn out just as great".  Bahh, I don't have time for that nonsense I said to myself.  (Tee Hee). I was so far from the person I am today.  With my daughters diagnoses, I can no longer BUY Lipton packets.  I was FORCED to find my inner chef and make it from scratch.  But making it from scratch still should not take forever, KWIM? Now how was it that check out lady said to make it.  Ahh fooey, I forget.  So off I go to figure out a simple version of what I recall her telling me back then.  I added a few things to it, like the onion, garlic and cumin.  I add cumin to everything Spanish or Mexican, I LOVE cumin.  It is my all time favorite spice!


1 cup Rice
2 cups Water 
2 Bouillon Cubes (herb ox Chicken, but either would work)
8 ounces Tomato Sauce
1 teaspoon Cumin
2 cloves Garlic, finely chopped
1/2 Onion, finely chopped
2 to 3 Tablespoons Oil

  • Set Water, Tomato Sauce and bouillon over medium heat in a small sauce pan.  The purpose here is to get the liquids hot.
  • Place oil in the pan over medium high heat.  
  • Add Rice, Onion and Garlic and sauté until rice begins to brown slightly.
  • Add rice to the heated liquids.
  • Cover and simmer on low for 15 minutes.
  • Stir in Cheese while warm (Optional).


reade more... Résuméabuiyad

Menu Plan Monday, Week of January 17th, 2011


I still have about 10 pounds of those potatoes from that HUGE 20 pound bag for $3.98.  I am going to have to figure out how I want to process them this week so they don't go bad.  Side dishes go a long way at our house.  The only potato dish that does not result in leftovers is Mashed.

Last weeks deals are still carrying me over to this week.  You will see the chicken and rice appear this week again.  This week I managed to secure ground beef for a good price.

I got my kids to eat the Salisbury Steaks by pretending they were Hamburgers and sticking them on rolls.  felt like Jessica Seinfeld and Deceptively Delicious giggling in the kitchen.  Tee Hee!  Score one for team Mommy!

We never did have the pizza from last week as well as the pasta.  In fact, Sunday we ate Cake for dinner!!! I guess every week there seems to be at least one dish that does not get made.  We end up eating what is on hand that day instead.

On a side note, the pastor at our church told me yesterday that the cookies I brought in over the holidays were gross.  LOL.  I love that he felt comfortable enough to tell me this and no my feelings are NOT hurt.  The cookies I brought in were not MY recipe.  The recipe I used you ask?  Pamela's Vanilla Roll Out Cookies recipe.  In hindsight, it was probably not a good idea to use a recipe I had not tried out first. I am most positive that had I brought in THIS recipe, they would have never noticed the difference.  Be fore warned, they may roll out and keep their shape  nicely, but they DO NOT taste good according to the "Wheat Eaters".


Monday:
I heated up a TV dinner one night last week.  It was Amy's Cheese Enchiladas.  It looked really gross.  So much so that I made a negative comment upon looking at it with son was there and listening.  If you have small kids, you will know that this is a HUGE no-no. So when he seen me take a bite and respond with joy he was shocked.  MAN was it good.  My son was shocked at my positive response and asked to try it and he liked it too.  So today I want to try and copy that dish.  Cheese Enchiladas on Corn tortillas, mexican rice.  I will also be making the big bowl of salad, some fresh bread for the week.  Dessert for the week is chocolate cake.

Tuesday:
I absolutely LOVE going to the Japanese Steakhouse in the next town over.  It is my all time favorite place to go.  The best part is the rice. But January and February are budget food months so I am not going.  Therefore I need to make some.   Chicken Stir Fry with Fried Rice served with Japanese Yum Yum sauce.

Wednesday:
Church is serving Chicken Spaghetti.  My son LOVED this dish last time it was served.  When I attempted to make it at home, he would not eat it.  This is my second chance to see how exactly they made it and get it right.

Thursday:
Pizza (new recipe) served with a green tossed salad.  Since Friday's are pizza day at school, I decided that making pizza on Thursday was a better idea.  This way I can send the leftover to school the next day.

Friday:

Chili served with White Rice.  That white rice I punched last week for $.50 is going a long way this week.  

Saturday:
Hot dogs and Chili Cheese Potatoes.  I am going to use the leftover chili here.

Sunday:
Using some of those potatoes to make some Gnocchi I think.  Gnocchi's are a soft and tender pillow like potato type dumpling.  My kids just love these.  I will serve it with some of that frozen meat sauce I have in the freezer.  If I feel adventurous I may attempt to bake some garlic sticks.  In my house, bread does not rise when I make it on Sundays.  Odd I know.  

reade more... Résuméabuiyad

Gluten Free Philadelphia Style Soft Pretzels

OK, so the picture is not of a dark pretzel.  I was eager to eat it, OK?  LOL.  It was so good!  It was so soft inside and had that famous pretzel texture and taste.  I have no intentions of sugar coating this for you. The rolling and twisting part is ten times harder than working with wheat flour.  I know that picture in my rolls post makes it look easy, but this is still sticky dough. If you are a Philadelphian born and raised like me, you will find it worth the effort.  This recipe is a keeper, hide it in your stash. :-)


3/4 cup Warm Water (110 to 115 degrees)
2 Tablespoons Oil
2 Tablespoons Sugar
2 1/4 teaspoon Rapid Yeast
3 Egg Whites
1 cup Tapioca
3/4 cup Brown Rice Flour (super Fine)
1/4 cup Potato Starch
1/2 teaspoon Vinegar
2 teaspoons Xanthan Gum
1 teaspoon Salt
1 teaspoon Baking Powder

2/3 cup Baking Soda
10 cups Boiling Hot Water
1/4 Coarse Kosher Salt (topping)
Melted Butter / Margarine  or Oil Spray

Preheat oven to 450 degrees.
Line baking sheets with parchment paper and lightly brush with oil.

  • Add Water, Oil, Sugar and Yeast into a small bowl or measuring cup and mix until combined.
  • Allow water to sit while yeast starts to get foamy.
  • Meanwhile, whip egg whites for approximately 1 minute or until it develops a Soft Peak.
  • Add vinegar, xanthan gum, salt, baking powder and flours in mixer with whip attachment and whip for 3 or 4 minutes.
  • In a Saute Pan or 8 quart sauce pan dissolve baking soda in hot water.
  • Once soda is throughly dissolved, bring water to a simmer.
  • Turn dough out onto an oiled surface and divide into 12 equal pieces.
  • With well oiled hands, roll each piece into a rope about 1/2 to 3/4 inch in diameter and twist into a pretzel shape and set aside on a baking sheet. (This is VERY challenging with the sticky dough and not for the faint of heart ~ LOL)
  • One at a time, place pretzel on a large slotted spatula and dip each pretzel into the simmering baking soda solution.  Simmer for 30 seconds or until pretzel looks slightly puffy (see picture).
  • Place on a greased baking sheet.  
  • Using pastry brush add butter/margarine or spray with oil and sprinkle with kosher salt.
  • Bake in preheated oven for 10-15 minutes, until browned.
This is what the pretzel looks like just out of the Water.

reade more... Résuméabuiyad

Gluten Free Rolls, Gluten Free Hamburger Buns

Whether its Sandwich rolls or Hamburger Buns you need, this recipe fits the bill.  I worked on the method and finally mastered a good Gluten Free Roll.  My Celiac child likes it, my regular diet son likes it and actually prefers it over store bought rolls.  How did I come across this wonderful awesome discovery?  Well it is the same recipe as that Udi's copycat white bread that I make.  A commenter on that post (Monica) suggested that it would make a good roll.  You know, I had gotten so used to making my rolls from the Pamela's mix that I never thought to make it into a roll.

I have experimented with this recipe and have two different variations to offer you.   First is the softer crust roll that is good for Hamburgers and the second is a nice replacement Kaiser roll for a submarine sandwich.  Both have a lovely soft fluffy interior.


Preheat oven to 170 degrees.  Once preheated turn oven off.  
Lightly grease a Hamburger Bun pan Large Muffin Top Pan.

  • Add Water, Oil, Sugar and Yeast into a small bowl or measuring cup and mix until combined.
  • Allow water to sit while yeast starts to get foamy.
  • Meanwhile, whip egg whites for approximately 1 minute or until it develops a Soft Peak.
  • Add vinegar, xanthan gum, salt, baking powder and flours in mixer with whip attachment and whip for 3 or 4 minutes.


Scoop out slightly heaping 1/4 cup worth of Dough.

Roll dough meatball style with your oiled hands.
This helps dough look more round.

Flatten dough into reservoir to fill up space completely.


Set dough into warmed oven to rise {30 minutes}
Finished risen roll will look like this.


With Cornstarch Added.
Result is a softer crust,
great for Hamburgers
Regular Flour Blend only.
Crust is crunchy and
has a hollow sound
when you knock on it.
Great for Sandwiches


  • With Risen rolls in oven, turn oven on to 350 degrees.
  • Bake 30 minutes.
  • Allow to come to room temperature.


Check out my Udi's copycat White Bread Recipe Post.


Click here to find my Gluten Free Flour blend.


Slightly Indulgent Tuesday
Tempt my Tummy Tuesday
Tasty Tuesday at Balancing Beauty and Bedlam
Delicious Dishes
Works for Me Wednesday
Gluten Free Wednesday
Full Plate Thursday at Miz Helens Country Cottage
Ultimate Recipe Swap at Life as Mom
Foodie Friday by Designs by Gollum


reade more... Résuméabuiyad

Menu Plan Monday, Week of January 10th, 2011


I am following along with the Pantry Challenge over at GoodCheapEats.  January is a time for new beginnings.  Along with that same thinking it seems like a nice time to renew your pantry, clean it out and pass along anything you have that is in excess that you my not need. This part is particularly hard for me.  I grew up dirt poor and food was not in abundance for us.  What I have to remind myself in doing this challenge is that the sales rotate and will indeed come back.  I start to see the supply getting small and think it will take more than I have to get it back. This is not so and lucky I have been doing it long enough now to know better now.

Each week I resolve to surf the sale ads for our local grocery store and purchase what is deeply discounted either with coupons or without.  And then I challenge myself to use what I purchased in a Gluten Free meal plan.

This will I secured lots of really discounted chicken breasts at $.98/lb., Chicken legs were 10 pounds for $4.90, potatoes were $3.98 for a 20 pound bag.  That huge bag of potatoes sure does look intimidating.  LOL.  Its Potato Week once again.


Monday:
Baked Chicken Legs, Parsley Potatoes, Veggie and Cheddar Biscuits.    Monday is the day I catch up on my baking.  Do I have enough sandwich bread for the week?  Rolls?  Breakfast breads?  I also make a dessert that will usually last the week for us.  Today I will be baking a Banana Cake.  


Tuesday:
We never did get to those Salisbury Steaks last week so here they are again. I'll serve them with mashed potatoes and broccoli.  


Wednesday:
Church has Breakfast for Dinner.


Thursday:
Chicken Cutlets, French Fries and Corn.


Friday:
Pizza and Green Salad.  The last pizza crust I tried my hubs said was the best yet.  This week I have another one to try.    Once I figure it out I think I will have to start making make ahead mixes.  


Saturday:
Soup, Salad and Fresh Baked Rolls.  I have lots of soup in the freezer from the holidays.  Bean and turkey noodle.  One of them will appear on the menu this week.


Sunday:
Spaghetti and Meatballs with Fresh Baked Rolls
reade more... Résuméabuiyad

Menu Plan Monday: Week of January 3rd, 2011


Well, it's January.  A brand new year.  A chance to start all over again and do things differently. I have plans for this year.  Not well formed out plans yet, but they are in the works none-the-less.  But in the meantime I am thinking of participating in a pantry challenge to use up or clean out and reduce what I have in the pantry. It will be more of a challenge this year.  We are gluten free now and I buy most of my supplies from Amazon in bulk on purpose because I can not source too many gluten free items locally.  So I do not necessarily want to use them all up.  But my ultimate goal is the operate on a strict budget for the month of January.  All of the items below I have already prepared in the freezer.

Monday:
Meatloaf, mashed potatoes and corn.

Tuesday:
Ham.  Oh so much ham.  I have no idea how I will prepare it.  But Tetrazzini was very good. Or maybe I will just bake it with brown sugar glaze

Wednesday:
Cream of Kielbasa and Bean Soup

Thursday:
Hamburgers with Fresh Baked Buns and French Fries.

Friday:
Salisbury Steaks, mashed potatoes and broccoli.

Saturday: Lunch: Sandwiches with Chips and dip.  Dinner: Pizza.

Sunday: Lunch: Sandwiches with Chips and dip.  Dinner: Hotdogs with Fresh Baked Buns.
reade more... Résuméabuiyad